Follow the verified path
Endacopia Misery Town Walkthrough: Circus Route
Complete the circus in the right order: recover the hands, solve Whack-a-Clown, earn the Red Ball, return with a mouth, and reach Trapezist.
Route at a glance
| Visit | Required state | Main result |
|---|---|---|
| First visit | Feet and torso | Hands, Scalpel, Red Ball |
| Return visit | Hands and mouth | Crowd cleared, Trapezist accessible |
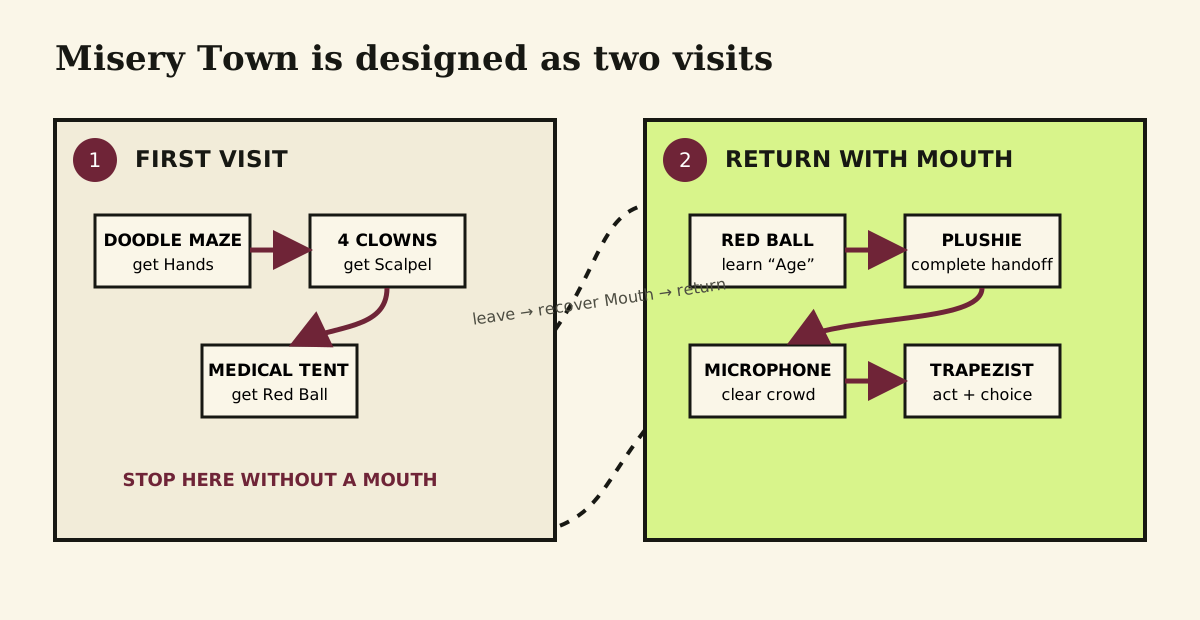
The game lets you visit the three Chapter 1 body-part areas in different orders. Misery Town deliberately stops progressing if you stay after the Red Ball without a mouth.
First visit: recover the hands
From the green hills, take the red-and-white carriage on the right.
- Use the yellow button beside the clown head and press Spacebar at the highest point.
- Enter the middle hazard-striped door.
- Follow the reappearing rope while avoiding the monster.
- Enter the arrow-marked tent and ride the train, changing tracks and jumping boxes.
- Enter the black-and-white tunnel and complete the five doodle-maze wall shifts.
- Collect the hands at the top.
The complete drawing-by-drawing path is in the linked Hands guide.
First visit: get the Scalpel and Red Ball
Leave the hands tunnel and move down from the crowd to the Whack-a-Clown hallway.
- Hit Red, Yellow, Pink, and Purple until each becomes a grave.
- Collect the Scalpel.
- Return across the train route to the Medical Tent.
- Use the Scalpel on the figure.
- Guide the Scalpel through all three courses without touching the sides.
- Collect the Red Ball.
At this point, leave Misery Town if you do not have a mouth. Return to the green hills and use the Office/Gambling Den route to recover it.
Return visit: clear the crowd
The following sequence is verified from the dedicated clown and Trapezist recording:
- With the mouth recovered, return to Misery Town and speak through the available dialogue with the blue-suited man near the crowd until you receive the Cute Plushie.
- Take the train to the other side and enter the black-and-white booth.
- Use the gift-related dialogue to complete the plushie exchange.
- Return to the green clown’s booth and finish the follow-up dialogue.
- Take the now-available microphone.
- Choose TELL EVERYONE TO LEAVE!!!
The announcement clears the crowd and opens the way into the performance tent. If the microphone is still unavailable, one of the blue-man, plushie, or booth conversations has not been exhausted.
Reach and fight Trapezist
Enter the newly accessible show. Follow the on-screen movement and Spacebar prompts across the short drum, ball, and hoop section.
The encounter then switches to the familiar first-person combat view:
- block incoming attacks instead of holding block until stamina empties;
- attack during the spaces between Trapezist’s balloon patterns;
- release block when safe so stamina can recover;
- repeat until the stage returns to side view.
Verification boundary
The Hands, Whack-a-Clown, Scalpel, and Medical Tent routes are independently confirmed by both a written Chapter 1 guide and gameplay. The return-visit dialogue and boss entrance are confirmed from a dedicated gameplay recording, while Neoseeker’s written guide currently stops before that return sequence. This page therefore remains marked partially verified instead of presenting the entire area as doubly sourced.
Evidence log
Sources checked
The first visit was cross-checked between a written Chapter 1 route and gameplay; the mouth-gated return and boss entrance were checked in a dedicated recording.
Hands, Clown, Scalpel, Medical Tent, and the mouth gate are independently cross-checked; the return dialogue chain currently has one direct gameplay source.